Devil’s Rocks
The Fortress ruin of Devil’s Rocks is the first dungeon visited. It is an old, abandoned fortress that was built into the Devil’s Rock hills western of Rosgart and long times ago and is now inhabited by monsters. The total area spans 3 floors, where the basement only contains the final two rooms. It houses a main room, which is an open area in the dungeon's center, surrounded by high natural stone cliffs, with some singular stone needles remaining over the room. One of them is especially large and an observation tower was built on it; the platform and tower can only be entered from the first floor. In several rooms the ceiling has broken down and reveals the sky above, some places are filled with debris which may be removed by using bombs (after they have been acquired). There's also a dried up well part of things dungeon.
Being the first dungeon, the puzzles should be kept on an entry niveau. The most challenging part currently is finding key no. 5 -- it is hidden in a room already cleared when the key is needed. In addition, for those specifically curious, there is an optional room in this dungeon (room 33). It can be cleared after the Spell of Light was learned, but it is not required to clear it for finishing the dungeon. Clearing it rewards the player with another spell which is entirely optional for the game (or maybe the player simply receives money, this needs to be decided).
The dungeon's entrance is on the east side, facing Rosgart. The maps below are turned so that the entrance is at the bottom side, which means north is towards the right.
This dungeon can only be actually entered after the hook has been aquired, because Room 1 requires its use.
Items
- The Bombs can be found in this dungeon.
- The Spell of Light can be learned in this dungeon.
Enemies
- Mostly easy enemies vulnerable to physical attacks. Dark rooms however house ghosts which can only be defeated if light enters the room (either by unblocking a physical light source or by using the Spell of Light).
Story integration
The dungeon's final room houses a wall drawing of seemingly mysterious nature. It will later in the game be revealed to show the path through the forest norther of the Black Mountains, requiring the player to return here.
Related tickets
Dungeon Map Drafts
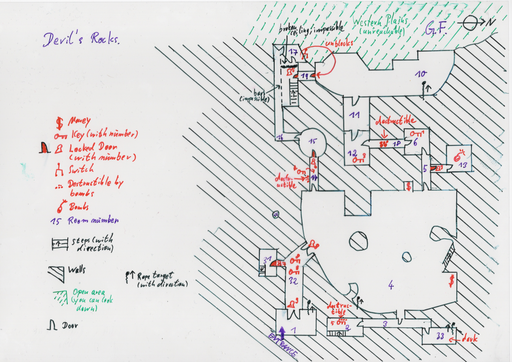
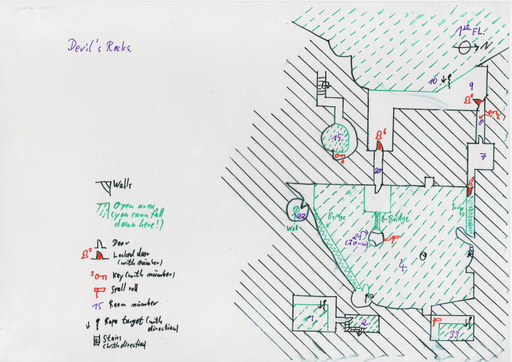
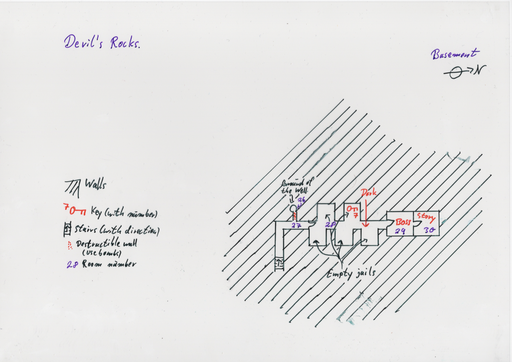
Note: North is towards the right!
Ground Floor
1st Floor
Basement
Room descriptions
The room numbers used below refer to the violet room numbers in the maps above.
Room 1
This is the entry room. There's a large stone door in front, but it opens into the room and is thus not openable. The only possibility to advance is to use the hook and enter the 1st floor, which runs as a platform around the room.
Room 2
The room is entered from the left side on a wooden platform with a broken stairway leading down into the ground floor. On the ground floor there's a table in the middle of the room and a monster guarding it. The door is blocked by wood that has fallen down from the ceiling; below the entry burns a torch. Clearing the room means to set fire onto the wood blocking the door to open the way up.
Room 3
A simple corridor with no surprises. Well, for the uncatious. The corridor's rear end consists of boulders fallen off the ceiling which may later be removed by using bombs, which will then open the way to the optional room 33. For now, take the ordinary door to the left from you.
Room 4 (Main room)
This is the main room. It is an open area, and its walls are actually natural cliffs where some bridges have been fastened onto (on the first floor). Some stone needles are scattered over the room, and a big one in the middle houses a vigilance tower on the first floor. Monsters straw around in this room. It is actually possible to leave through the stone door on the southern side (these doors are one-way doors until you have the key), collect keys 8 and 9 and thus make it easier to enter the main room for the next time you come to this dungeon. This however is optional. It is also possible to directly enter room 14 through te south-western door, but that room is dark and cannot be cleared without the bombs, so you are better off using the north-eastern door and enter room 5.
Room 5
It's a corridor. The door to the right is locked, but you can advance through the one in front of you.
Room 6
The ceiling has come off in this room, revealing the sky. Rubbel, boulders, wooden bars are scattered through the room, a handful monsters strawling around. This room houses key no. 1 -- it hangs on a nail in the wall. The player needs to find a way to climb up to it, moving around the debris.
Room 7
Taking the key, return to the main room (4) and climb the stairs on the north side. Through a hole in the surrounding cliff, go over the bridge and unlock the door in front of you with key no. 1. This will lead you to room 7.
TODO: What exactly needs to be done in room 7?
Room 8
A dark corridor with two ghosts. It is necessary to defeat those in order to receive key no. 2, which will unlock the rear door of this same room. Too bad ghosts are invincible if there is no light. Tapping in the dark, the player will ultimately find that there is a lever on the left wall. Turning it will open the curtain of a window high at the ceiling, letting in the light. Now the ghosts can be killed!
Room 9/10
The "room" is actually a platform on the west side of the hills the fortress has been built into. You have a great view over the grassland extending from here to the west, but you cannot actually go down to it and leave the dungeon (of course). The other door on this floor is blocked, but you can go downwards simply by jumping over the edge, enternig the ground floor again. If you ever wish to return, use the hook.
Right below the door that is locked on the first floor, there is an unlocked one on the ground floor, leading to room 11.
Room 11
TODO: What to do in room 11?
Room 12
Room 12 yields key no. 3. TODO: What to do in room 12?
Room 12 has a door leading to room 18, but there are boulders inside room 18 that block the pathway. Without bombs, you will not get further here.
Room 13
Key no. 3 opens the locked door in the corridor from room 5. You see, on the map there's another corridor leading north, but actually I think it is better to just directly enter room 13 (which is why the corridor has no room number) and not implement the connecting corridor; it simply has no use.
Room 13 confronts you with the miniboss. Once you enter, a cutscene plays where this evil guy spots you, runs towards a lever on the room's side, turns it, which makes bars fall down on the door -- the player is trapped now. The connecting rope is drawn up high into the air, unreachable by normal means. Fight starts, and with the victory the player receives the bombs. Now, how to leave again?
The room has several statues on the sides. The player has to find out that these statues can be blown up by using the bombs; and in falling down, it is possible to climb upon the fallen statues. This makes it possible to reach for the rope that is connected to the bars blocking the door. Hang onto it, and draw up the bars with your weight.
Room 14
Enter the main room again and then leave through the south-western door into the dark room that could not be cleared before. Room 14 employs actually the same concept as room 8: a dark room with two ghosts that need light to be defeated. There is even the turn lever here for the ceiling window. Except it's blocked by boulders. You need the bombs to blow away the boulders and the proceed as before. The ghosts when defeated yield key no. 4, which unlocks the rear door leading to room 15.
Room 15
TODO: What to do here? It's a circular room!
Room 16 and 17
Room 16 is a corridor leading to a platform (room 17) on the west side again. The room is divided by metal bars; behing the bars is a stairway leading upwards, and right before the stairs you can see a door (which leads to room 19). It is possible to enter through the second door on the platform (room 17) back into room 16 so you are on the other side of the bars, but alas! the ceiling here has come down in such a large amount that you cannot even use the bombs to remove the debris. To reach the stairs there is no other option than to enter through the door of room 19. Luckily for you, you can unblock the southern door of the platform that room 10 is by finding and activating a switch on the platform that is room 17.
Note: The platforms 17 and 10 can be seen from one another, but it is not possible to directly cross them.
Room 18
Room 18 is a corridor with boulders in it blocking it. They can simply be blown up. Note how room 18 is actually optional; it would be possible to simply go the long way through room 7 on the first floor and skip room 18. But we're lazy, after all.
Room 19
Ah, finally nearing the stairway of room 16, are we? Room 19 is a tiny corridor with just two doors. The northern one was unblocked by the switch, but what about the other one? You name it -- it is locked. What on earth?!
This is the dungeon's most difficult puzzle, becaus nothing has been overlooked, and still the door in room 19 is locked. What follows is the player mentally needing to check all passed rooms. The solution lies in the already cleared room 2 right at the dungeon's start. There is a statue in this room akin to the statues in the room 13 (where the bombs where found). This statue can be blown up with the bombs -- the player did not and could not know this when first clearing room 2. Behind the statue the player finds key no. 5, which will unlock the door in room 19.
Behind the door now lies the stairway, which in turn leads to the first floor and therein to room 15 again, which has a platform running around it. TODO: There should be some puzzle on the platform. After solving that puzzle, key no. 6 is received, which opens the other door in room 9 leading to room 20.
Room 20
A corridor with no surprises. It is modelled after the two dark corridors, but this time the window is already uncovered and light is in the room. No ghosts, lucky you!
The corridor leads to a larger platform on the first floor of the main room (4). From the platform stretches a bridge over to the platform with the vigilance tower. Enter it.
Room 21
Room 21 is the vigilance tower. It should contain a rather complex puzzle which ultimately yields the scroll for the Spell of Light.
Room 22
The curious player may have already entered room 22, because it is accessible right from the start. It can be found by using the hook on the eastern side of the main room to reach the first floor and a wooden way leading to a platform on the south side, where an open door leads to room 22. This room is circular, and in its middle there is a well. That well is blocked by a mysterious blackish material with a reddish sparkling if touched; it has probably been moved over the well for safetey. This is magical material; it can be made transparent by casting the Spell of Light onto it. That is why the room was not clearable before.
Rooms 23-25
These rooms do not exist. I made an error in numbering. My apologies.
Room 26
This room is the well. The only way to enter it is to jump into the well hole in room 22. This requires quite some courage, because the well is deep and you cannot know what is at the ground (note: maybe give a hint somewhere else in the dungeon or outside of it, like a man talking about the well). The bottom of the well is not the ground floor, but the basement -- you are falling two floors deep and would take severe damage if the ground was hard. Luckily, there is still enough water in the well: it is deep enough to catch the fall swiftly. On the side, there is a small platform. The wall appears to be not really think, and indeed: place a bomb there and you will open a path leading to room 27.
Room 27
This room is lit by light coming down the stairs (which lead up to room 31 by the way, which has a window). Turn to the left: enough with wooden doors. This is a massive metal door, but luckily it is open. It makes exactly the right noise for heavy metal doors; once through, you are in the darkness of room 28.
Room 28
The water drips from the ceiling and in this complete darkness of course live some ghosts, along with other monsters. This time there is no window for you, you are in the basement after all. Only the use of the Spell of Light will guide you through here. Utilising it, you see that this room consists of many old jails, with rusted and broken bars being the reminiscences.
Note: In the basement the background music is lowered so that the water dripping fromt he ceiling with echo effects take the main audio role (next to the ghosts).
In one of the cells there is key no. 7 to be found, which opens the exit door in room 31, which neatly gives a quick way to the dungeon's entrance (this is quite useful when the player later needs to return for story reasons).
TODO: Envision a nice puzzle for room 28.
Solving the puzzle of room 28 unblocks the door to room 29.
Room 29 (Boss room)
This is the boss room. TODO: Define the boss enemy!
Room 30 (Story)
Room 30 appears to be a shrine. At the wall, there is a pattern of mysterious significance; it can be looked at, in which case it is shown screen-filling: “There is a pattern on this wall.” Before it, on stone table, rests a chest wherein there is an indecipherable document to be found.
Exiting (rooms 31-32)
After collecting the document the dungeon is cleared. Leave through the stairs leading to room 31, go trough room 32 and find yourself back in room 1 with the dungeon's entrance. You can now leave the dungeon.
Room 33 (bonus)
Room 33 is optional. The player needs to be smart enough to notice there is a room uncleared. In the corridor that is room 3, blow up the rear wall with the bombs and enter into room 33. This is a dark room with no windows; you need the Spell of Lights to get rid of the ghosts. Then the player needs to look upwards to clear the room: there is a hook target that allows to climb up to the first floor. There some kind of bonus can be found (maybe an optional spell or simply money).
Updated by quintus over 4 years ago · 12 revisions